iTunes How To Guide For iPhone Newbies
Since some 40-50% of iPhone users are reported to be newbies to the iTunes – here is a basic and beginners guide to getting music & video onto your iPhone (of course, if you’re new to iPods, most of this will also work for you).
While iTunes is now the front end to syncing for your iPhone plus a myriad of other additions (photos, podcasts, games, etc …), we’ll just concentrate on how to get music & video onto your iPhone/iPod first.
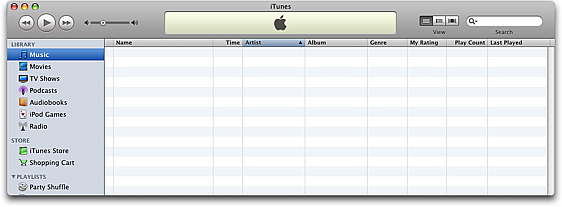
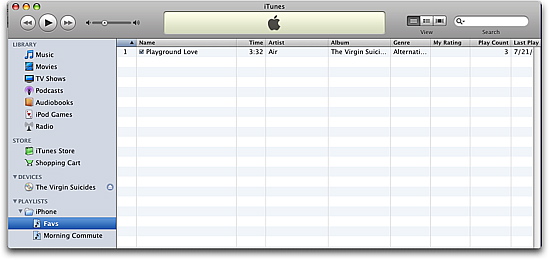
When you first launch iTunes, it will look something like this. The categories listed at the top & left are the “LIBRARY” files. Consider these the “home base” where all your various files are stored from MUSIC to MOVIES TO PODCASTS, etc … (unfortunately, GAMES are not available on the iPhone).
The STORE categories are self-explanatory, The music & video store is accessed by clicking on the iTUNES STORE line. Anything you put in your SHOPPING CART is shown in the next line when you click on it and after you buy something, a third category will show up – PURCHASED.
The PLAYLISTS are your self created and titled playlists for your iPhone/iPod depending on how you like to categorize or listen to your music. If you just want them all in one playlist, you don’t have to worry about it. If you prefer to listen to different music drivng your orning commute versus your late afternoon, just select NEW PLAYLIST & name it. You can create a playlist with one song and have it repeat … though you might have people leaping from your moving car.
The first-time-you-open iTunes has a few listed that look like playlists but are actually PARTY SHUFFLE and “smart” playlists. WE’ll get to those in Part 2. For now, we’ll just cover the newbie tasks. You can delete them or just create a new playlist and ignore them for now.
We’ll talk about creating playlists in greater detail below.
For now, let’s start with CD’s and music you want to import into iTunes and then sync to copy over onto your iphone.
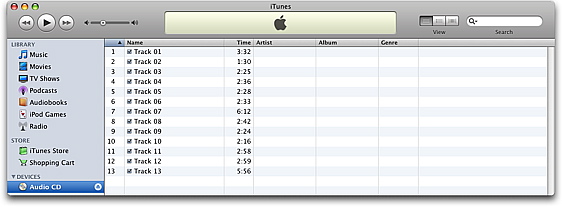
INSERT YOUR CD
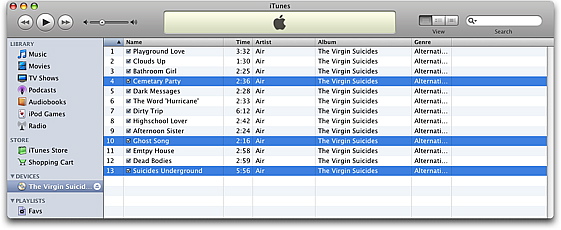
It will takes a few seconds but your CD will show up with some information filled in.
Without this next feature, frankly, we’d all be listening to a lot less music but thanks to efforts of internet music lovers everywhere, we have a database to tap into – essentially automatically.
Under the menu ADVANCED, select GET CD TRACK NAMES.
In this case, the VIRGIN SUICIDES soundtrack rightfully appears.
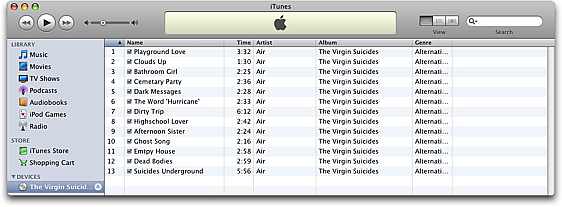
What you are actually doing is accessing the Gracenote Database, (formerly CDDB database). What’s nice is you don’t really hafve to do much more – the search is automated – it’s vast and pretty complete but it is not foolproof and if you listen to obscure music, it might not be in the DB yet so you might need to enter in the info manually or make any corrections.
If you just need to make a small change in one column – perhaps a typo in track 3, just click on the track and start typing. However, if there is a lot of incorrect info or in some cases ALL CAPS …
Select ALL and then look in FILE and select GET INFO. (Mac users can select COMMAND/APPLE-A for Select ALL and COMMAND-I for GET INFO).

You can make multiple changes such as if you prefer it to read Virgin Suicides Soundtrack or if you prefer another “genre” rather than Alternative + Punk (we will get to the CD artwork later).
Once it’s close enough, you can close the GET INFO window. Don’t worry – you can go back later after you have converted them to MP3 to make more changes or additions.
Next, go to the menu ITUNES and select PREFERENCES. Click ON ADVANCED and IMPORTING.
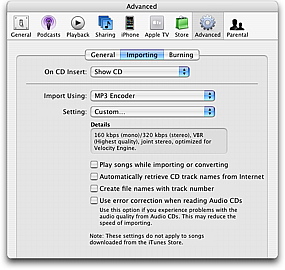
The following bit on the settings are subjective and ultimately your choice. While Apple prefers Mp4’s, Mp3’s are more ubiquituous and easier to deal with but the choice is entirely yours. If you will only ever play digital files with an iPod or iTunes or QT, then your choice is pretty transparent whatever you choose – all Apple software/hardware will play either without you noticing a difference. Mp4’s tend to be about 10% smaller at the same encoding rate so if you absolutely want to squeeze a handful more tracks on the iPhone, then you can go with Mp4’s but keep in mind, unlike mp3’s – a format that everything can play in most car stereos or even most DVD players – the ultimate choice is yours.
The IMPORT USING is a pop up window so you can select. There are other choices but this is a newbie guide so I recommend MP3.
Under SETTING, you can select an encoding rate. I will not bore you with the details of the rate of encoding except that the higher the rate, the closer it will sound to your CD version. The tradeoff is file size. A 3-minute encoded at 320 kpbs VBR is about 100% larger than the 192 kbps version. It depends on your music collection and how many tracks you want to fit onto your iPhone. If you store NO video, photos or much else, you can hold about 2,000 songs – however, my guess is most people will have room for no more than about 1,000 songs because you want to include some video, photos plus email, contacts and bookmarks will also take up some room.
So, if you definitely think you have less than 500 songs you want on there, you can choose the highest encoding rate of 320 kpbs and select VBR on. If you think you want maybe closer to 1,000 songs, you probably want to select 192 kpbs VBR on. Again, these are not hard and firm numbers. If you plan on including 200 Ramones songs, you can go as low as 128 kpbs VBR without losing much fidelity but if you listen to a lot of jazz, you probably have to stick with higher settings. You can experiment and decide if the sound versus the file size is worth the tradeoff. You are pretty safe in sticking with 192 kpbs VBR and higher.
You’ll also notice some other settings below you can turn on. For instance, instead of having to search for the CD name, you can select it so it turns on automatically – this was a checkmark when most people had dialup but now, most people have always-on internet so you can check it and when you put in a CD, it will auto look it up in a matter of seconds.
Click OK when done.
Now you ready to “rip” (aka: converting CD audio to MP3/Mp4).
If you want to convert every track – again SELECT ALL and select under ADVANCED> CONVERT TO MP3 (if you selected mp4 as your preference, the menu will read CONVERT TO MP4).
As soon as you release the menu, it will start to convert, putting the files in a folder within your ITUNES/MUSIC folder. But don’t worry, you don’t have to look for the Mp3/Mp4’s – once converted, they will be placed in your LIBRARY>MUSIC folder/line at the top in iTunes.
Conversion will take anywhere from a few minutes to less than 10 if you have a lot of other processing going on the background. A new temporary line will appear on the left CONVERTING and you can see files along with a progress bar at the top.
What if you only want one song or a couple tracks from the CD? A simpler way is to just to highlight those tracks.
Mac users can hold down the COMMAND key to select non-contiguous tracks. Hold down the COMMAND key and then use the mouse to click the tracks you want. Now, you have four ways to convert:
Select the ADVANCED>CONVERT TO …
Right Click and select CONVERT TO …
Or you can drag the highlighted tracks to the LIBRARY and it will convert and place them in the LIBRARY MUSIC folder.
(Or if you have already created a NEW PLAYLIST (in this case named FAVS), you can also directly drag the track from the CD and drop on top of that line to convert directly).

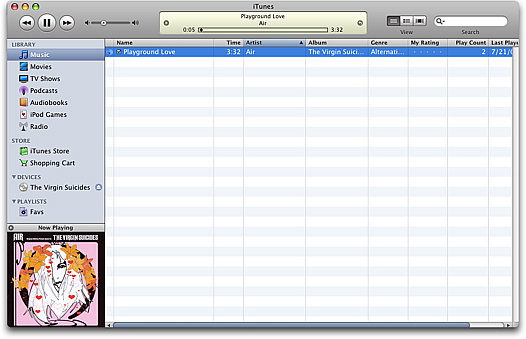
In this case, I just converted one track.
Now, when I click in LIBRARY MUSIC folder, you’ll notice the track is there.

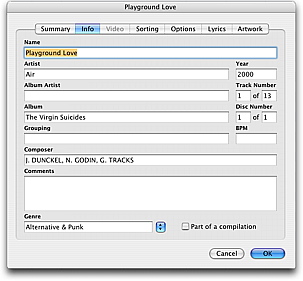
Now is the chance to make any changes before syncing with the iPhone. Again, select GET INFO. You can make any text changes including adding keywords. One important thing you’ll want to add is CD artwork so COVERFLOW looks cool on the iPhone. If the Apple store sells the CD – you can select GET ALBUM ARTWORK but if it doesn’t – you have to do some manual work.
In this case, the artwork appears once you select play:
If the artwork does not appear, you want to select GET INFO>ARTWORK. You can scan it in yourself or simply go to Amazon, look it up and drag it to your desktop and then drag into GET INFO>ARTWORK.
There are also a couple dozen utilities ranging from freeware to commercialware that will help you look up album artwork. Depending on your preference and interest, here is a listing from VersionTracker for you to try out and see what you like best.
Onto the next step, creating our iPhone PLAYLIST – in this case, I have named it FAV and you simply drag the track from the LIBRARY to this playlist. What’s great is you can create as many playlists as you like without having “duplicates” of the track you converted since the LIBRARY is the main one – the PLAYLISTS ones are merely “links” to the original track – after all, if you love a song to put it into 5 playlists, there’s no point in it taking up five times the space.
You can also go one step better and create FOLDERS. The advantage is it’s less clutter when you close up the arrows. In this case, I create an iPhone folder. Select FILE>NEW FOLDER and I’ll place the FAVS into it and create a MORNING COMMUTE playlist also.
You can continue to convert new CD’s or if you already have other Mp3’s, you can simply drag them in.
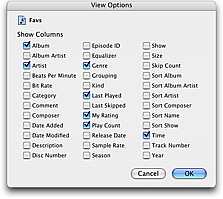
Under VIEW>VIEW OPTIONS, you can decide what categories you want to see by clicking on the ones you want visible:
At the bottom of the itunes page, you will get a running count of how large this playlist or folder is – keeping in mind you don’t want to exceed 8 GB and realistically, if you’re going to add video, podcasts, audiobooks, photos, etc, you should probably cap it at 4 GB or so though iPhone sync will show you a running and visual total.

If you need a tutorial on video conversion, read our earlier guides here and here.
Drag those files into LIBRARY>VIDEO.
Or of course, the iTunes video store offers you thousands of TV shows, movies and music videos – including tens of dozens that are free. (THIS LINK will launch ITUNES). There are also free music tracks every week and/or of course, you can buy tracks from the iTunes store just by clicking. Ag=fter it is placed in the purchase folder/line – simply click on the track and dropping it on a playlist.
NOW, this is where the iPod and iPhone diverge. The SYNC function and settings work different. The following bit is for the iPhone only.

If you don’t have an iPod, then you are okay to leave the SYNC AUTO setting on but if you do have an iPod or you want to keep different files in iTunes but not necessarily in your iPhone, then turn off AUTO SYNC.
Then when you go to the MUSIC TAB, just click YES to the playlists/folders you do want to copy over to your iPhone:
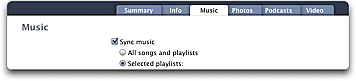
Then select SYNC at the bottom of the page.
Repeat with videos, podcasts and photos.
You can also back in iTunes PREFERENCES and make other changes. Most are pretty self explantory. Good luck!
| « 40 Gigabits Per Second Surfing Speeds Can Be Yours…In Sweden | Scarface: What Could Be More Gangster Gangsta Than Flip Flops … » |